
Add, Edit, and Delete Matters
Matters are the software’s building blocks, allowing you to create timecards, expense cards, invoices, trust transactions, and use the software’s practice management tools.
Your matter options include:
- Add
- Edit
- Copy
- Delete
- Archive
Add a Matter
To add a matter:
- From the left navigation panel, click Matters.
- From the toolbar atop the Matters screen, click Add Matter.
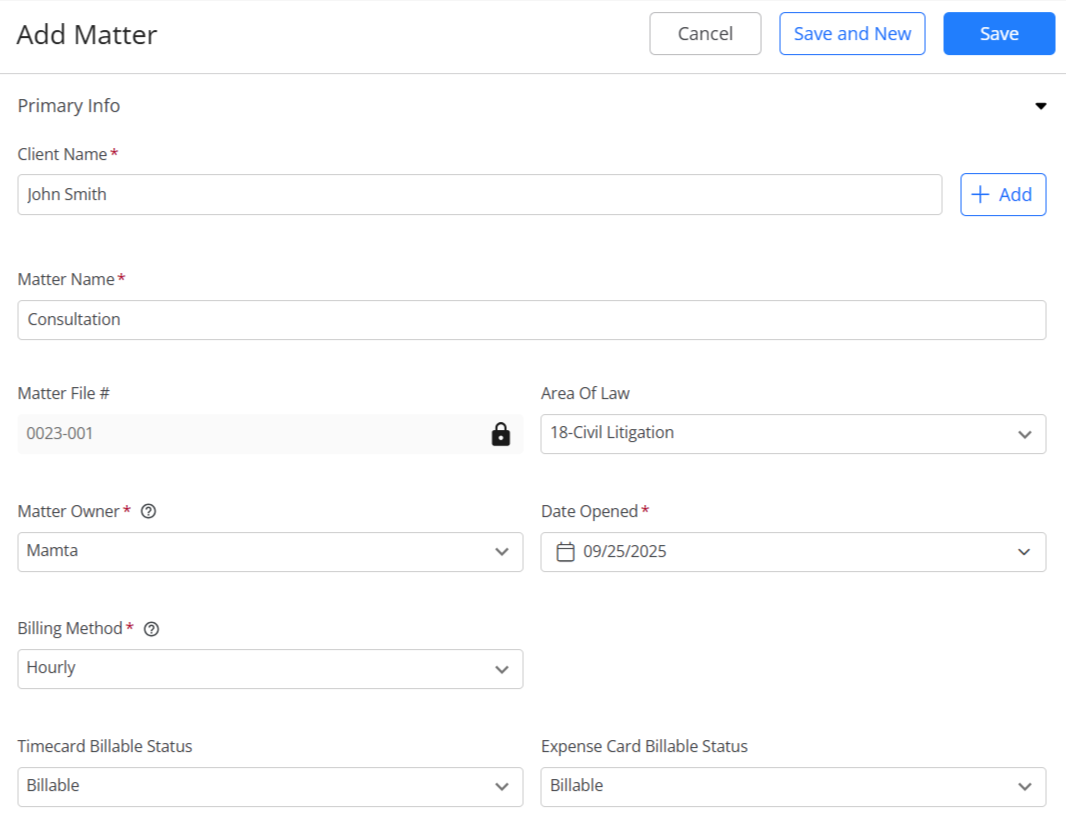
Add Matter Screen Fields
| Matter Template | Select from the drop-down matter templates that have preset parameters for certain types of matters, helping you to efficiently add a matter with prefilled entries.
Note: Check your tier to determine the availability of this feature. |
| Client Name | Take the appropriate action:
|
| Matter Name | From the drop-down, click the matter name. You can also enter a new name or customize the list. |
| Matter File # | Enter an internal tracking number, if desired. The system can also auto-generate this field. |
| Area of Law | From the drop-down, click the area of law. This is a required field for Canadian firms. |
| Matter Owner | From the drop-down, click the matter owner. |
| Date Opened | Defaults to today’s date. You can use the drop-down to click a different date. |
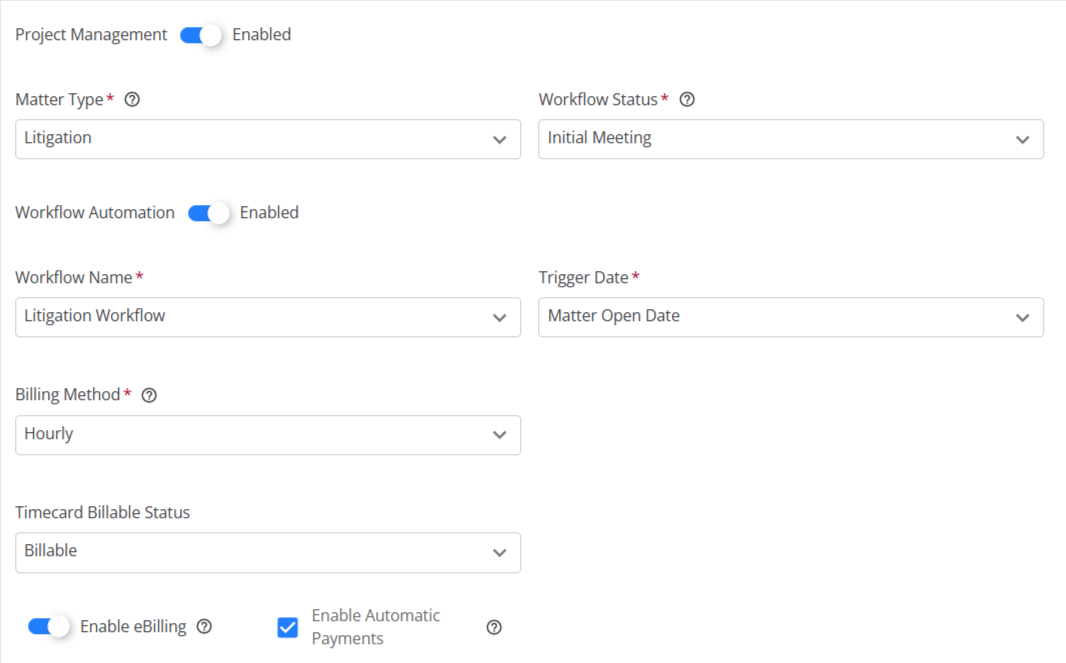
| Project Management | If you wish to enable Project Management for this matter, slide the toggle button on. Note that this button will be disabled if you have not turned on the Project Management settings within the Setup section. |
| Matter Type | If you have enabled Project Management, select from the drop-down. If NOT, you can select a case type from the drop-down or click on + Create New to create a new case type. |
| Workflow Status | This field will only be visible if you have enabled Project Management. You can choose from Open, In Progress, or Closed. |
| Enable Workflow Automation | If you wish to Enable Workflow Automation for this matter, slide the toggle button on. |
| Workflow Name | This field will only be visible if you have enabled workflow automation. Choose from the drop-down. |
| Trigger Date | Choose between Matter Open Date and Custom Date. Enter Start Date if you select Custom Date. |
| Billing Method | From the drop-down, click the billing method. If you choose Fixed or Contingency, additional fields will display for fee entry. |
| Timecard Billable Status | If you select hourly billing method, this will default to billable. If you choose Fixed or Contingency, this will default to non-billable. You can use the drop-down to choose a different billable status. |
| Expense Card Billable Status | Use the drop-down to choose from Billable, Non-billable or No Charge billable status for the expenses. |
| Enable eBilling | If you wish to enable eBilling for this matter, slide the toggle button on. Note that this button will be disabled if you have not turned on the eBilling settings within the Setup section. |
| Enable Automatic Payments | Enabling this will allow the system to present automatic payment options during the invoice addition or approval process. |
| Trust Bank | From the drop-down select the trust banks you wish to associate with this matter. From the section’s Default Trust Bank field, use the drop-down to select the default trust bank. Important: You must link a matter to a trust bank to enter trust transactions. |
| Notes |
|
| Statute of Limitations |
|
| Custom Labels | Add a custom label if desired. |
| Active | Toggle the button on to make the matter active. If at any point you wish to archive your matter, you can edit the matter, and toggle it off, then save. That will move the matter to the inactive list within the system. |
In the upper right corner, click Save and New or Save.
Save Options
| Save and New | Click Save and New to save the matter and enter another matter right away. Helpful for bulk entry. |
|---|---|
| Save | Click Save to save the matter and return to the Matter’s Settings screen.
|
Edit Matters
You can edit an individual matter or bulk edit matters.
Edit Individual Matter
To edit a single matter:
- From the left navigation panel, click Matters.
- On the Matters screen, either double-click the matter, or click on the three dots at the end of the row, then from the drop-down, click Edit.
- In the tabs on the lower half of the Matter’s screen, click Settings.
- From the tabs atop the Settings section, click Matter Info.
- On the Settings Matter Info screen, edit the fields as needed.
Note: If you wish to edit a field that is locked, click the lock icon to unlock it.
If you entered billable items, you will not be able to change the billing method. - In the upper right corner, click Save.
The system saves your updates.
Bulk Edit Matters
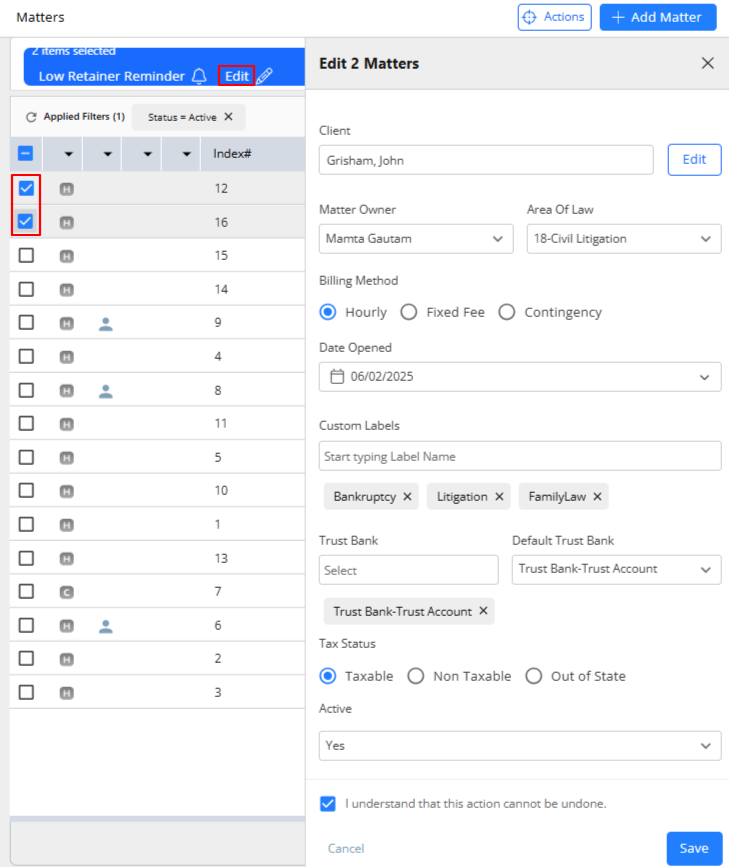
To bulk edit matters:
- From the left navigation panel, click Matters.
- On the Matters screen, check the boxes beside the matter(s) you wish to edit.
- From the toolbar above the matters grid, click Edit.
- In the edit panel that opens, you can update key fields like client, matter owner, billing method, tax status, trust bank, and more.
- Once you have made your changes, check the box beside I understand that this action cannot be undone. to validate the message.
- At the bottom of the panel, click Save.
Your job will be queued and once complete, the system will save your updates.
Copy a Matter
You can copy a matter’s information and settings into a new matter.
To copy a matter:
- From the left navigation panel, click Matters.
- On the Matters screen, single-click the matter, click on the three dots at the end of the row and from the drop-down, click Copy.
- On the Copy from Source Matter screen, click Edit Client to select a different client or to edit client information, if needed.
- From the Matter Name field’s drop-down, click the matter name or enter a new name.
- From the Open Date field’s drop-down, click the open date or leave the default to today’s date.
- Click Save.
Note: You can use the same file name for two separate matters under the same client provided the file numbers are different.

Delete a Matter
Note: You can delete a matter if you have not entered time or expense cards, invoices, transactions, calendar events, or notes. Otherwise, the matter can only be closed or made inactive.
To delete a matter:
- From the left navigation panel, click Matters.
- On the Matters screen, single-click the matter, click on the three dots at the end of the row and from the drop-down, click Delete.
- The Delete Matter message box reads: Are you sure you want to delete selected Matter? Click Yes.
The system deletes the matter.
Archive a Matter
To archive a matter:
- Confirm you are not retaining funds for the matter. If the matter shows a trust balance, you must disburse all funds prior to archiving the matter.
- Accrual-based accounting clients must write-off accounts receivable/unpaid balances prior to archiving the matter.
- On the Matters screen, single-click the matter, click on the three dots at the end of the row and from the drop-down, click Edit.
- On the Matter Info/Definition page, scroll down to the very end of the screen and toggle the button off beside Active.
- In the upper right corner, click Save.
The system moves the matter to Inactive status.