
Secure File Sharing and Requesting with the LexShare Integration
Access your Documents from Matters
- From the navigation panel, click Matters.
- On the Matters screen, double-click a specific matter then scroll down.
- From the tabs atop the summary section, click Documents.
- Here, you’ll discover all the folders and documents related to the selected matter.
Access your Firm Documents
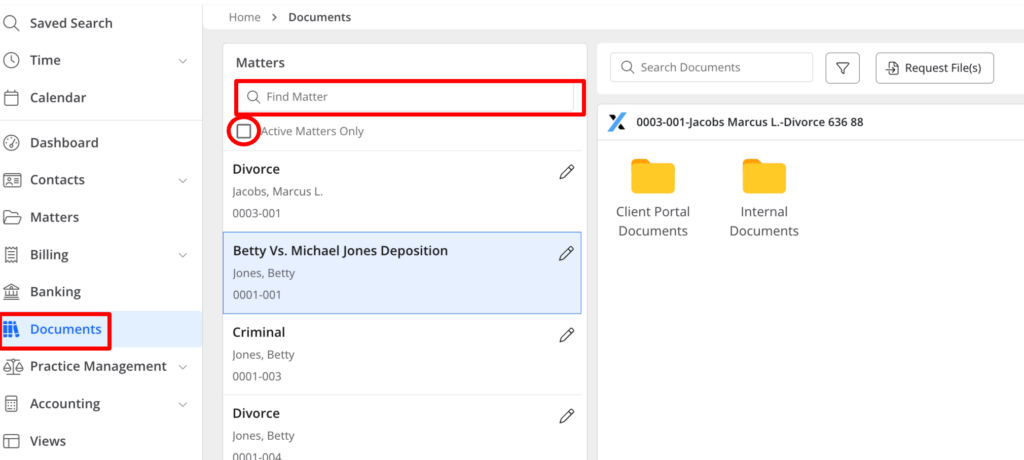
- From the navigation panel, click Documents.
- On the Documents screen, either double-click a matter or utilize the search bar to locate the desired matter.
- Check the box to display ‘Active Matters Only,’ if relevant.
- Here, to the right, you’ll discover all the folders and documents related to the selected matter.
Share Files
- Whether you’re in the Matter documents section or the Firm documents, single-click to highlight the document for which you’d like to request a signature.
- Click on the document, then select the three dots located in the top right corner of the document, and click Share File.

- LexShare Share Files Page Fields

- Files to Include:
- The system will include the file you selected
- Select more files to share – You can choose this option to add more files from within your LexShare document application to share with your client
- Upload new files – You can choose this option if you wish to share files saved elsewhere in your system
- Who has access
- This allows you to control who can view the request link.
- From the drop-down, you can choose between Direct Link and Question/Answer.
- If you select Question/Answer, a drop-down will display a list of questions. Select the question and enter its answer in the field below.
- Note: Only those with the link who know the answer to the question can access the files shared by you.
- Expiration
- After you turn the toggle button on, you can choose to disable the link on a specific date.
- Enter the date on which you would like the link to expire in the MM/DD/YYYY format.
- Send Emails
- Enabling this toggle button will reveal a box where you can enter the recipient’s email address.
- If you intend to send the email to multiple recipients, click on the “Add recipient” box to include additional email addresses.
- Email Message
- Utilize the provided box to enter any message you want to accompany your files. Fill in the necessary fields on the LexShare “Share Files” page to complete the sharing process.
- Files to Include:
- Once complete, click the Create Share link.
Request Signature
Note: The ability to request a signature is available exclusively for PDF, DOC, and DOCX file types.
- Whether you’re in the Matter documents section or the Firm documents, single-click to highlight the document for which you’d like to request a signature.
- Click on the document, then select the three dots located in the top right corner of the document, and click Request Signature.

- On the LexShare page, scroll down to the Select Template section.
- From the drop-down menu, choose Custom Template.

- Within the document that opens, use the options on the right to drag and place fields where needed on your file. Various field options are available, such as Signature, Initials, Date, Timestamp, Text, Dropdown, Multiple Choice, and Signer Attachment.
- After finalizing your selections, click Finished.
- LexShare ‘Prepare documents for e-signature’ Page Fields:
Workspace - The system populates this with your Client’s name.
Who has access - This feature empowers you to manage access to the file through the provided link. Those with the link can only access the files if they know the answer to a specific question.
- You can choose between two options from the drop-down menu: Direct Link and Question/Answer.
- If you opt for Question/Answer, a drop-down menu will appear with a list of questions. Choose a question from the list and input the corresponding answer in the field provided below. This ensures an additional layer of security for accessing the files via the shared link.
Template - This is the custom template you selected in the previous step.
Signer - Signer#1: Use the drop-down to select the signer if their name is already in the system, or enter the first and last name of the signer. Below that enter the email id of the signer.
- If you want the file to be signed by more than one person, you can use the Add new option.
Receive Email - You can use the drop-down to Choose a Staff member in your firm who will get notified once the signed document has been uploaded.
Instructions - Use the box to customize your instructions to the recipient of the file. This will be displayed on the email.This action will redirect you back to the previous LexShare page for preparing documents for e-signature.
- Once you have filled in all the required fields, click Prepare Request. If you need to make any changes, click Cancel. By clicking Prepare Request, LexShare will initiate the processing and send an email notification to the recipient. You have the option to review the request on this page. Subsequently, your client will receive an email containing a link to the document in LexShare.
