How the Application Works With Document Storage Integrations
If you are using one of our document storage integrations, it will be helpful to understand how the syncing process works and where limitations exist.
Folders
Once you complete an app integration (OneDrive, Dropbox, Box, etc.), the system adds a folder to your cloud storage account within which you will find your matter folders accessible.
As an example, Box displays this main folder…

…and these individual sub-folders for existing matters.

Important: Some document storage providers place integrated content in a designated area. For integration/syncing to work properly, the folders must remain in this default location.
Configuring Document Folders
By default all integrations are set up as follows:
- Matter Folder Root Path: {Matter Folder Name}
- Matter Folder Name: {MatterFileNumber}-{ClientName}-{MatterName}
If you would like to change the default root path or folder name, you can do so under Setup>Firm Settings> Document Settings. This setting does not apply to the application’s native storage and NetDocuments.
Alert: Proceed with caution when changing this setting. Incorrect configuration can cause the document integration sync to fail.

This will only apply to new Matters going forward.
If you need to change this setting for a specific matter, you can do so under Matter Details > Settings > General Info.
Create Matter Folder Root Path
- From the toolbar, click your Profile icon.
- From the drop-down, select Setup.
- From the Setup gray left navigation, click Firm Settings.
- From the tabs atop the Firm Settings screen, click Firm Preferences.
- On the Firm Preferences screen, scroll down to Documents Settings.
- Choose your default document app from the drop-down.
Note: You must have an account set up with a document storage provider before linking it to the application. - Click on the orange detail icon beside Matter Folder Root Path.
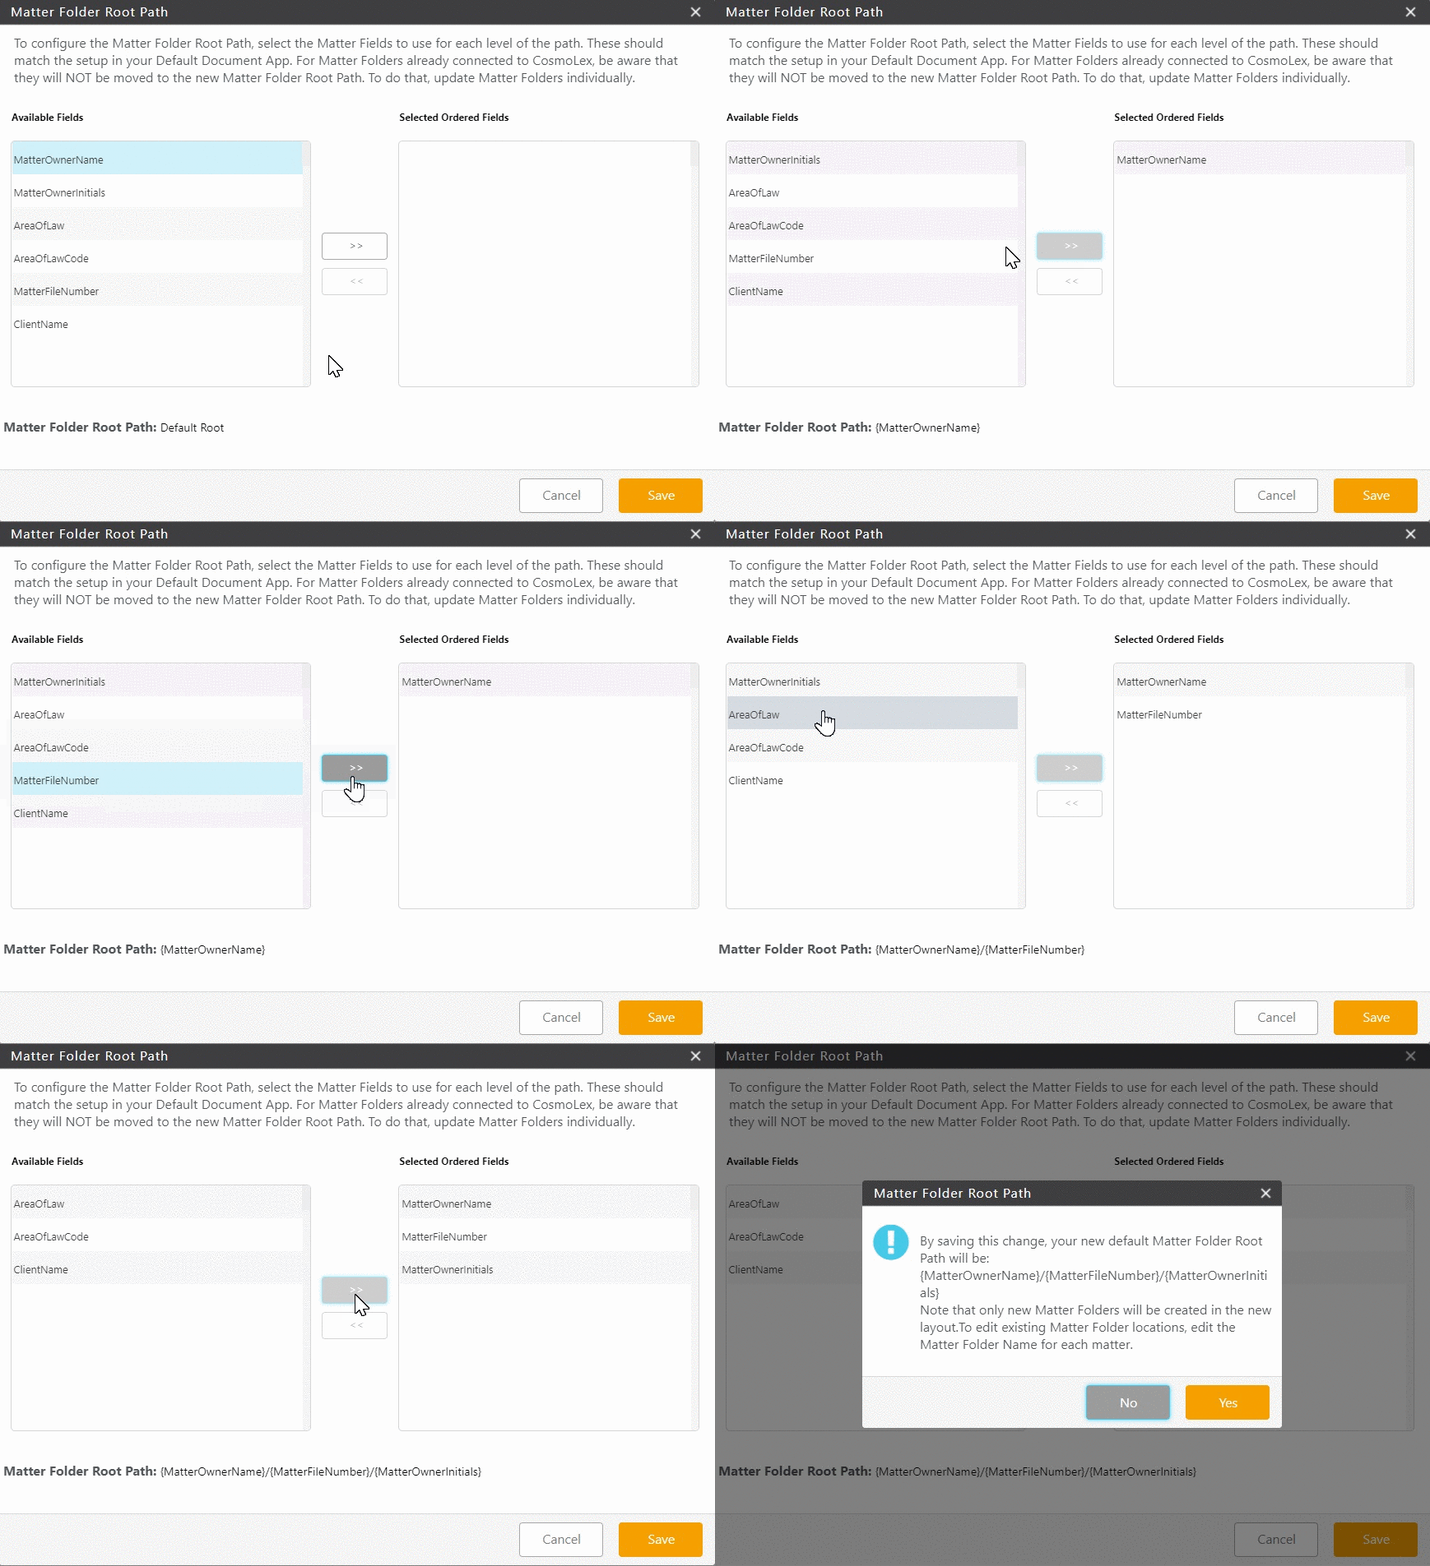
- A screen will open with a column listing Available Fields as options to create your own path.
- Click on the field you wish to select, then click on the arrow to the right.
- Your selection will populate the Selected Ordered Field column and show in the Matter Folder Root Path at the bottom.
- Once you have created your Matter Folder Root Path, click Save.
- The message box reads: By saving this change, your new default Matter Folder Root Path will be…
- If satisfied with the Matter Folder Root Path, click Yes.
- The system will create your Matter Folder Root Path going forward.

Matter file number is a required field. You may change the order but it has to be part of the matter folder name sequence.
Create Matter Folder Name
- From the toolbar, click your Profile icon.
- From the drop-down, select Setup.
- From the Setup gray left navigation, click Firm Settings.
- From the tabs atop the Firm Settings screen, click Firm Preferences.
- On the Firm Preferences screen, scroll down to Documents Settings.
- Choose your default document app from the drop-down.
Note: You must have an account set up with a document storage provider before linking it to the application. - Click on the orange detail icon beside Matter Folder Name.
- On the Matter Folder Name screen, select the fields to use for each part of the name from the drop-down.
Note: Matter file number is a required field. You may change the order but it has to be part of the matter folder name sequence. - Once you have selected the desired fields, click Save.
- The message box reads: By saving this change, your new default Matter Folder Naming pattern will be…
- If satisfied with the Matter Folder Name, click Yes.
- The system will create your Matter Folder Name going forward.
New Matter Folders
When you add a matter, the system automatically creates a new matter folder in your cloud storage which syncs with the Documents section within the application.
Existing Matter Folders
To add folders to existing matters:
- From the left navigation panel, click Matters.
- On the Matters screen double-click the matter, or single-click the matter to highlight it, then in the toolbar, click Details.
- From the Matters Details left navigation, click Documents.
The Documents message box reads: The matter you are looking for doesn’t have a folder assigned. Do you want to create one? - Click Yes.
The system creates a folder and two sub-folders for the matter:Client portal documents Includes documents your client uploads through the client portal Internal Documents Includes all other documents
Though these are the default folders, you can create as many additional folders or subfolders as you need. If you create them in the application, they will display in your integration document application, and vice versa.
Rename a Folder
Matter folders have a default naming convention of [Client-Matter]. There are three ways you can edit a matter’s folder name.
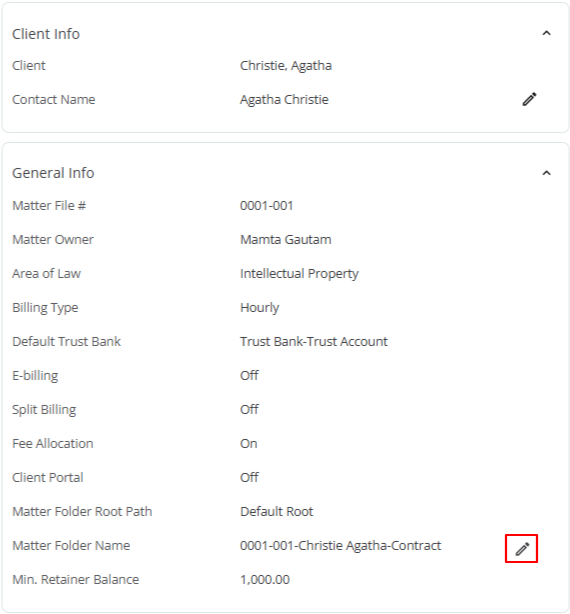
From Matter Details > Summary
- At the bottom of the General Info section, hover to the right of the Matter Folder Name.
A pencil icon appears, displaying an Edit tooltip. - Click Edit.

The Change Matter Folder Name window opens. To avoid unnecessary edits, the folder name is locked.
- Click the lock icon. The Matter Folder Name message box reads: Matter Folder Name is set by the system and it’s not recommended to change it manually. Continue?
- Click Yes.
The Change Matter Folder Name box displays the matter name and the unlocked icon. - Edit the matter name.
- Click Save.
The system updates the matter’s main folder name in your application and your integrated storage tool.
From Matters Details > Documents
- Right-click the main folder’s name and click Rename Matter Folder Name.
The Change Matter Folder Name window opens. To avoid unnecessary edits, the folder name is locked. - Click the lock icon. The Matter Folder Name message box reads: Matter Folder Name is set by the system and it’s not recommended to change it manually. Continue?
- Click Yes.
The Change Matter Folder Name box displays the matter name and the unlocked icon. - Edit the matter name.
- Click Save.
The system updates the matter’s main folder name in your application and your integrated storage tool.
From Documents
- Hover to the right of the Matter Name.
A pencil icon appears, displaying an Edit tooltip. - Click Edit.
The Change Matter Folder Name window opens. To avoid unnecessary edits, the folder name is locked. - Click the lock icon. The Matter Folder Name message box reads: Matter Folder Name is set by the system and it’s not recommended to change it manually. Continue?
- Click Yes.
The Change Matter Folder Name box displays the matter name and the unlocked icon. - Edit the matter name.
- Click Save.
The system updates the matter’s main folder name in the application and your integrated storage tool.
Storage Limitations
Native Storage
If you are storing your documents using the application’s native storage, then each document cannot exceed 100MB.
Document Integrations
When integrating with an external document storage tool, your vendor determines the storage limitations.
Client Portal Sharing
Whether or not you are using a document integration tool, documents you share through the client portal cannot exceed 100MB.

