
Customize Email Templates
To assist you in sending emails to outside parties directly from your application, the system comes pre-loaded with messaging for these emails. In addition, this article outlines the steps you will have to take to edit, customize, or create any number of templates in the system.
Customizing allows you to do the following to your email templates:
- Edit existing/Rename
- Restore
- Create new
- Delete
Access Email Templates
- From the toolbar, click your Profile icon.
- From the drop-down, select Setup.
- From the Setup left navigation, click Firm Settings.
- Select the Email Templates tab.

Edit/Rename a Template
- Navigate to the Email Templates section.
- Click Edit/preview to the right of the template you’d like to view. For Intake Form notification emails, you can use the drop-down to choose which notification email you’d like to view.

- An alert will then populate stating “Changes must be made carefully and saved using the toolbar”. Click OK.
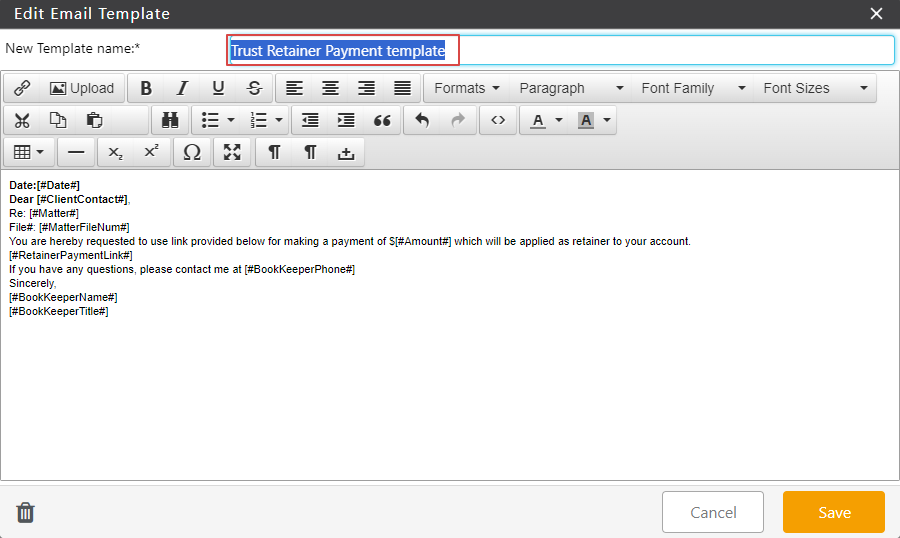
- You will then see a preview of the email messaging. Use the toolbar at the top of the window for additional editing formatting options. Hover over the icon with your mouse to see the description of the icon. If you are proficient in HTML, you can click the source button < > to edit that way instead.
Alert: These templates contain merge fields (e.g [#FirmName#]) which will populate with the appropriate information upon sending. We highly recommend leaving these fields as is to ensure information populates correctly. - To rename the email template, you can override the existing name by selecting the name and typing over it.
- When changes are complete, click Save. These changes will only impact future emails which are sent.
- If you do not wish to make any changes, you can close this window without saving by clicking Cancel or the X at the top right of the window.
On-the-Go Edits
When completing one of these actions in the system (email invoices, retainer reminder etc.), you will see a preview of the respective template and have the ability to make edits to the subject line and email body then as well. Those changes will be for that email job only and will not update the system template.
Restore a Template
There may be a time when you want to revert to the default template.
Alert: If you choose restore, all modifications to the email template will be erased and the template will be restored to the default. Proceed with caution as those previous revisions cannot be recovered.
- Navigate to the Email Templates section.
- Click Restore to the right of the template you’d like to restore. For Intake Form notification emails, you can use the drop-down to choose which notification email you’d like to restore.
- An alert will then populate stating Template will be restored to the original format. Any custom changes made will be discarded. Continue? Click Yes.

Create New Email Template
You can create new email templates for Email Invoice, Invoice Reminders, Low Retainer Reminders, and Online Trust Retainer. To create a new email template:
- On the Email Templates screen, use the arrow in the field beside where you want to create a new template.
- From the drop-down, click + Create New Template.
- On the Create New Template screen, you have the option to:
- Duplicate Existing Template: Select an existing template and make changes to it.
- Create New Template from Scratch: Use a blank template to create your own invoice template.
Duplicate Existing Template
To duplicate an existing template:
- Use the steps to create a new template.
- On the Create New Template screen, choose Duplicate Existing Template and click Next.
- On the Create Template page, in the Select existing templates drop-down, click to choose a template.
- In the New Template Name field, enter the template name.
- Once you have made modifications to the template, click Save.
Your template will be saved and will appear in the drop-down.
Create New Template From Scratch
To create a new template from scratch:
- Use the steps to create a new template.
- On the Create New Template screen, choose Create New Template From Scratch and click Next.
- On the Create Template page, in the New Template Name field, enter the template name.
- You can copy each field name from Invoices and Letter Template Fields and paste it into the desired location in your template.
- Once you have created the new invoice template, click Save.
Your template will be saved and will appear in the drop-down.
Delete an Email Template

To delete an email template:
- On the Email Templates screen, use the arrow in the field beside the area from which you want to select the template you wish to delete.
- Once you have selected the template, click Edit/preview.
- A message will then populate stating “Changes must be made carefully and saved using the toolbar.” Click OK to continue.
- On the Edit Invoice Template screen, confirm that you have selected the correct template in the New template box, then in the bottom left of the template, click on the delete icon.
- The message pop-up will read, Delete successful. Click OK.