This article will walk you through the various fields of a timecard, offering guidance on efficiently adding your time.
TIP: You can navigate through time entry fields by using the tab key on your keyboard, and the selected field will have a blue border.
Watch a Video
You can enter your time from various areas:
Add Time Card
If a matter is already chosen when entering time, this field will fill in automatically. If not, you can start typing the client, matter, or file number, and a list of suggested matches will appear for you to select from. This is a required field.
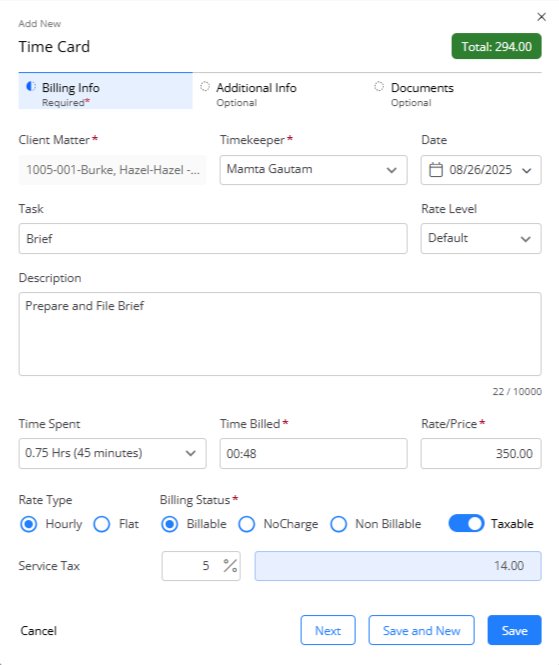
Billing Info Tab
| Timekeeper (required) |
|
| Date (required) |
- This is the date your firm completed the task, and it is the date that will be displayed on the invoice.
- This date will automatically default to today’s date but can be manually changed.
|
| Task (required) |
- This is a concise title for the activity; detailed information should be provided in the description field.
- You can freely type in this field, select from the suggested list as you type, or use the drop-down list to choose from saved tasks. To customize your task list, refer to customize your List Items.
- This field is not required on its own, but you must have either the task or description completed.
- By default, invoices will include tasks and descriptions, but that setting can be changed.
|
| Rate Level |
- The default level will be pre-selected unless there was a matter localized rate set. You can also change the level here if needed.
- You can customize labels for your rate levels under the List Items section.
- The value of these rate levels will depend on the timekeeper chosen. You can see that value in the rate/price field.
- Learn more about default rate levels for timekeepers.
|
| Description |
- A detailed description of the activity which was done. There is a limit of 10,000 characters.
- You can create default descriptions for your saved tasks when you customize your list of items.
- You can also create shorthand codes to assist with quicker data entry.
|
| Time Spent |
- Use the drop-down to select time spent. This field is not required.
- By default, the system will take time spent and round it to the nearest tenth of an hour for time billed. However, this setting can be changed.
|
| Time Billed (required) |
- This is the amount of time that will be displayed on the invoice, and calculated against the chosen rate.
- If the time spent is already chosen, the time billed will automatically be rounded based on the minimum timer unit setting and displayed in hours and minutes.
- You can overwrite this amount if needed and the value will recalculate.
|
| Rate/Price |
- Populates based on the timekeeper and rate level selected.
- Matter-specific billing rates also impact this field entry.
- You can overwrite this field.
|
| Rate Type |
- Defaults to an hourly type and works with the corresponding rate.
- To bill a flat rate for the task select Flat and enter the flat amount in the Rate/Price field. This will not calculate against the time billed.
|
| Value
Displayed on the top right of the window |
- The total amount to be billed for this task.
- If your Timecard is based on an hourly rate type, Value = Rate/Price x Time Billed.
If your Timecard is based on a flat rate type, Value = Rate/Price
|
| Billable |
- The default option for hourly matters.
- The timecard value will add to the unbilled balance and appear on your next invoice.
|
| No Charge |
- For courtesy items that you are completing free of charge.
- The activity and $0.00 amount will be displayed on the invoice.
|
| Non-Billable |
- Default (and only) option for fixed fee and contingency matters, but can also be chosen for hourly files.
- The timecard value will not add to the unbilled balance or be included on the invoice.
- This option is typically used to track productivity on fixed fee/contingency matters, or non-billable administrative work
|
| Taxable |
- If this setting is not enabled, no tax will apply to this entry.
- If this setting is enabled, you can review the rates applied to this entry (as determined by the matter setting) and can make changes if needed. These changes will only apply to this entry.
|
LEDES – eBilling
If this matter is set up for eBilling, You will have slightly different options when entering a timecard.
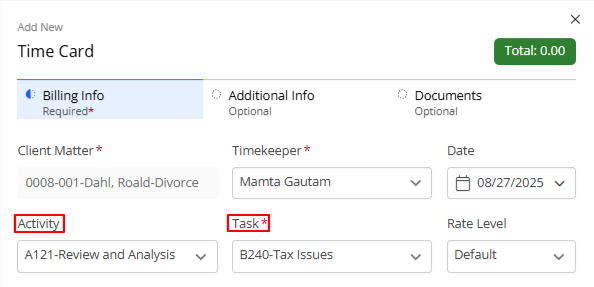
| Activity |
- This field is only available for matters with eBilling enabled.
- Choose an activity code from the preset code list.
- You can customize these options under Setup > List Items > Tasks > UTBMS
- You can also restrict activity codes on the matter if necessary.
|
| Task |
- Choose a task code from the preset code list.
- These can be customized under Setup > List Items >Tasks > UTBMS and restricted on the matter, if needed.
|
Additional Info Tab
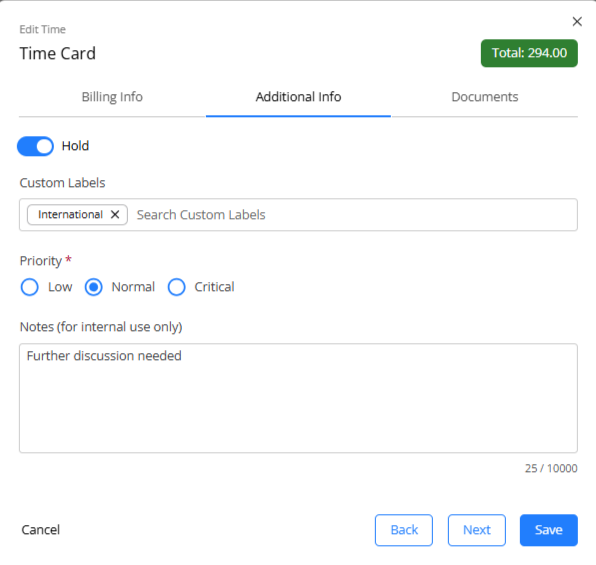
| Hold |
- Enable the toggle to place the timecard on hold.
- The next time you invoice your matter, this item will not be included.
- When you are ready to bill for it, edit the timecard and uncheck this box to free it for billing.
TIP: On the time/expense tab you can use the filters (on the right) to show items on hold. |
| Custom Labels |
- Add a custom label, if desired.
- You can customize labels under the List Items section.
|
| Priority |
- You can flag the timecard with a priority billing level.
|
| Notes |
- These notes are for internal use only and will not be printed
- There is a limit of 10,000 characters
|
Documents Tab
In this section, you can attach any documents to support the activity you are logging. These documents will be accessible on the timecard itself, as well as within the matters document section. These documents will not be visible to the client unless shared in the client portal.
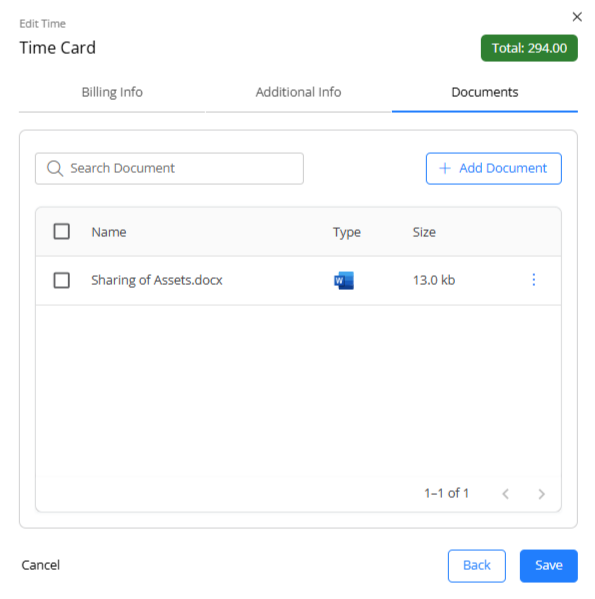
| Add Document |
- Add a supporting document to this timecard.
- All documents are added to a timecard display under the matter’s Documents tab.
- The system creates a folder named @Timecards under Internal Documents.
|
| Delete |
To delete supporting documents from this timecard:
- In Bulk: Check the box beside the uploaded document(s) and from the toolbar above the grid, click Delete.
- Individually: Click the three dots at the end of the row and from the drop-down, click Delete.
|
| Download |
To download a supporting document to your computer:
- In Bulk: Check the box beside the uploaded document(s) and from the toolbar above the grid, click Download.
- Individually: Click the three dots at the end of the row and from the drop-down, click Download.
|
| View |
- When referring back to the timecard, you can view PDF and image files.
- Click the three dots at the end of the row and from the drop-down, click View.
|
Save Options
| Next |
Click Next to complete the remaining tabs. |
| Save and New |
Click Save and New to save the timecard and enter another timecard right away. Helpful for bulk entry. |
| Save |
Click Save to save the timecard and return to the Time/Expense screen. |
