
Creating Tasks
Tasks are used to organize workflows, facilitate collaboration, and enable efficient deadline management. They monitor progress, foster accountability, and document actions for auditing, contributing to overall efficiency in handling legal matters.
Watch a Video
Add a Task
You can add a task from several places within the application:
From Quick Action
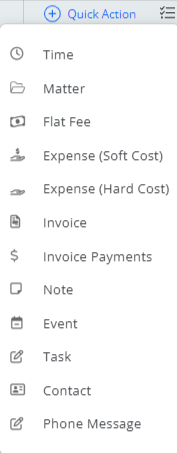
- From the toolbar atop any page that you are in, click Quick Action.
- From the drop-down, click Task.
- Enter the Task details.
- Once you’ve entered all of the task details, in the top right, click Save.
From Practice
- From the left navigation panel, click Practice.
- From the Practice menu, click Tasks.
- You can add tasks from the Board View and Grid View.
- On the Board View, you can add a task to the Not Started and In Progress swimlanes, or from the toolbar atop the screen by clicking Add Task.

- On the Grid View, from the toolbar atop the screen, click Add Task.
- Enter the Task details.
- Once you’ve entered all of the task details, in the top right, click Save.
From Calendar
- From the left navigation panel, click Calendar.
- In the right drawer on the calendar screen, click Tasks.
- From the toolbar atop the panel, click Add Task.
- Enter the Task details.
- Once you’ve entered all of the task details, in the top right, click Save.
From Matters
- From the left navigation panel, click Matters.
- Once you’re on the Matters screen, double-click a matter to view its details.
- From the tabs on the matter’s summary section, click Matter Management.
- From the tabs on the Matter Management section, click Tasks.
- From the toolbar, click +Add Task.
- Enter the Task details.
- Once you’ve entered all of the task details, in the top right, click Save.

Add Task Screen Fields
| Task Name | Enter the task name. |
| Start Date | From the drop-down, click the task start date. |
| Due Date | From the drop-down, click the task due date. |
| Estimated Hours | Enter the estimated hours. |
| Actual Hours | Enter the actual hours. |
| Mark this task as private | If desired, check this box to block other users’ ability to view the task. |
| Share via Client Portal | You will see this option if you have the client portal enabled for the matter |
| Link to Matter | Take the appropriate action:
|
| Billing Status | From the drop-down, click the billing status. Note: If you mark this task as Billable, you will see the checkbox, Create timecard for this Task. If you check the box the system will automatically create a timecard for this task based on the rate of the Primary Assignee selected. |
| Primary Assignee | From the drop-down, click the primary assignee. Click Add Additional Assignee to add them when applicable. Any users restricted by the Ethical Wall will not be displayed in the drop-down. |
| Notifications | Click Add a Reminder. Use the drop-down and entry fields to set your reminders. |
| Description | Enter a task description. |
| Custom Labels | Click Add a Label to add labels, if desired. |
| Task Options | Use the Status field’s drop-down to click a status. Once you have completed a task, click Done. This will remove it from the task list. |
| Priority | Use the drop-down to select from Low, Medium, or High. |
| Task Color | Click a color to assign it to the task, if desired. |
| Send an Email When the Task is Completed | Uncheck the box, or leave it checked. |
To learn how to view a task, change its status, mark it as done or delete a task, see Manage Your Tasks