To automate what happens after an intake is submitted, you can create a workflow for each intake using a visual Workflow Builder. A set of customizable triggers enables you to send communications and documents, schedule a consultation, and add timed delays between steps, ensuring that no critical step is missed.
Once a lead submits an intake form, you don't have to do the follow-up yourself. The Workflow Builder lets you automate what happens next — sending emails and documents, offering a consultation booking, and adding timed delays between steps — so no critical step gets missed.
You design the workflow once, publish it, and from that point on it runs automatically for every lead who submits the associated intake form.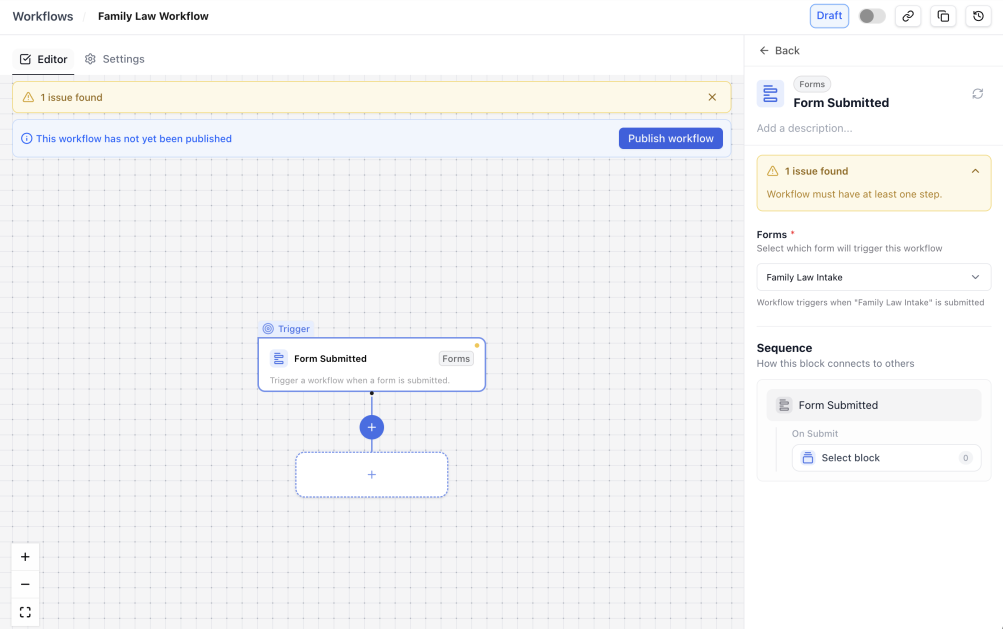
A workflow is made up of a trigger (what starts the workflow) and one or more steps (the actions it performs). Every workflow starts from a single trigger, Form Submitted, and you can add any of the following step types:
| Step | What It Does |
|---|---|
| Send Communication | Sends an email to the lead (the form submitter), your team, or both, using a customizable template. |
| Send Documents | Sends downloadable documents to the lead, your team, or both. |
| Schedule Meeting | Lets the lead book a consultation through your connected Calendly account. |
| After Delay | Pauses the workflow for a specified period of time before the next step runs. |
Once every step is configured, you publish the workflow. A published workflow is either Live (running automatically for new submissions) or Paused (published, but not executing). You can edit, duplicate, pause, resume, or delete a workflow at any time.
Create a Workflow
When you're finished setting up templates and integrations, you can begin creating a Workflow.
To create a Workflow:
- From the left navigation panel, click Intake > Workflows.
- On the workflows screen, click Create New Workflow in the center of the page, or Create Workflow in the upper-right corner.
- In the Add Workflow pop-up, enter a Workflow Name.
- Click Create.
The new workflow opens in the Workflow Builder canvas and is automatically saved as a Draft. You can leave the page at any time — your draft remains available in the Workflows grid.
Tip: Once you've built and configured a workflow, duplicate it to reuse the same setup for another form instead of starting from scratch. See Manage Your Workflows
Set the Trigger
Every workflow starts with a trigger. Form Submitted is currently the only available trigger.
To set a trigger:
- On a new workflow, click Set a trigger in the center of the Workflow Builder canvas.
- In the right sidebar, click Form Submitted. The trigger is added to the canvas, and its configuration panel opens.
- Click the Forms dropdown in the configuration panel and select the published form that should start the workflow.
Add and Configure Steps
Once your trigger is configured, add steps to the workflow.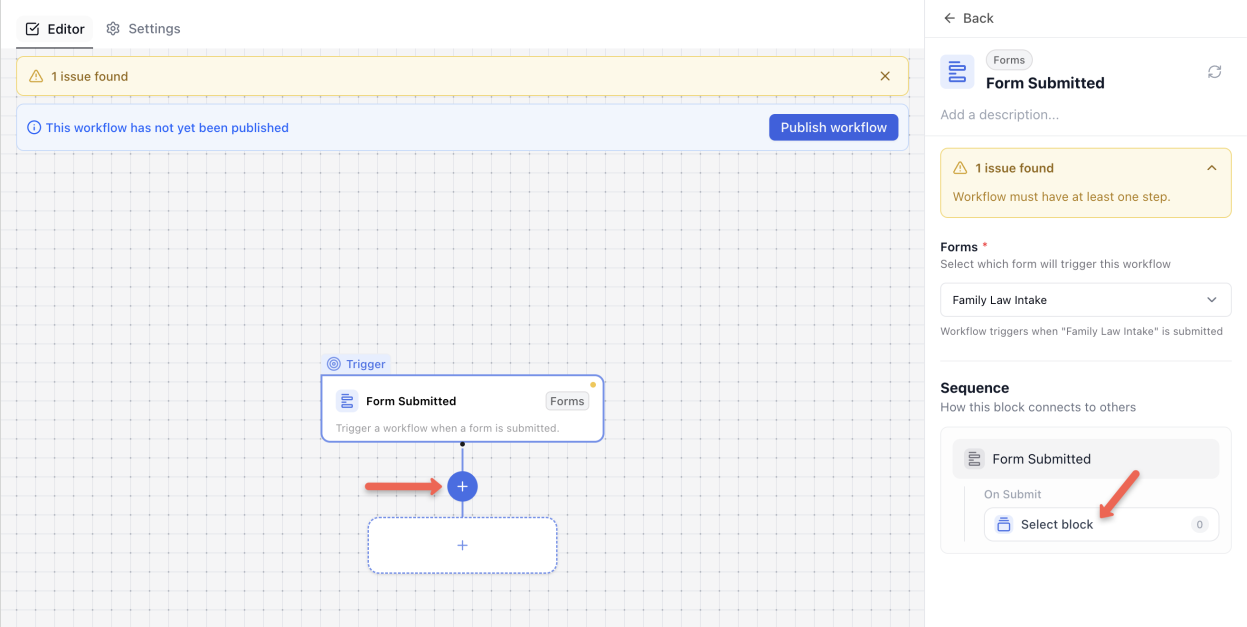
-
Click the blue (+) icon on the canvas, or click Select Block under the Sequence section of the trigger's side panel, to open the Next step panel.
-
Browse the available blocks, grouped by category, and click the one you want to add.
When you select a block, it's placed on the canvas — automatically connected to the block before it — and its configuration panel opens on the right.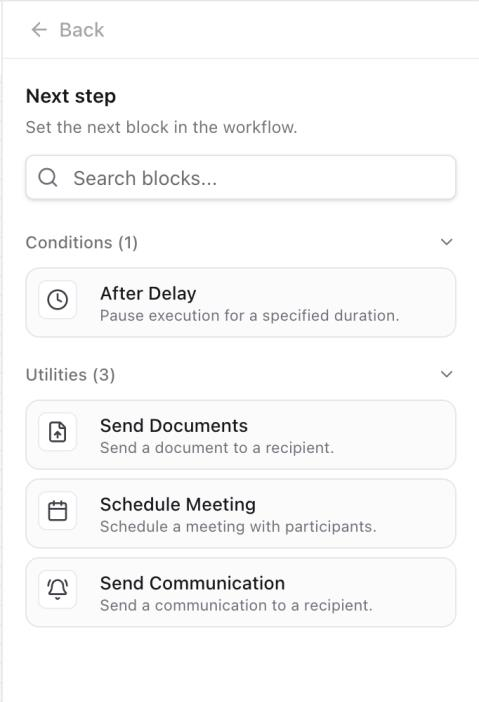
-
Add each following step the same way, using the blue (+) icon or the Sequence section. Click any block on the canvas to reopen and adjust its settings.
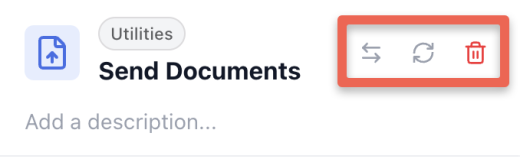
Each step includes the following actions:
- Swap — replace the current block with a different block type, keeping it in the same position in the workflow.
- Reset — clears the block's configuration and restores it to its default state.
- Delete — removes the block from the workflow.
Update Status
The Update Status block lets a firm automatically move a lead to a new status. When a workflow reaches this step, the lead’s status is updated automatically, helping keep the intake pipeline current without requiring manual updates. The block can be added after any trigger or workflow step, and multiple Update Status blocks can be used in the same workflow.
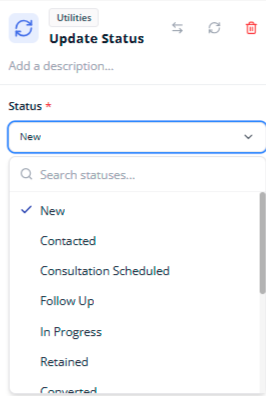
To add the Update Status Block, open the Next step or Previous step panel and select the Update Status block. To configure the block, select a status from the firm's active statuses drop-down.Select one status for each update status block. For example, after the Form Submitted trigger, you could add the Status Block New. As the workflow progresses, you could add more statuses to it. The lead ultimately ends up in the status set by the last Update Status block that ran successfully. Each status change, confirmation, or skip appears in the lead’s Activity Log, attributed to System as the user that performed the action. The log entry description names the workflow that made the change:
-
Changed: Status changed from New to Contacted via Workflow “[Workflow Name]”
-
Confirmed: Status confirmed as Contacted — already set via Workflow “[Workflow Name]”
-
Skipped: Status update skipped — [reason] via Workflow “[Workflow Name]”
Send Communication
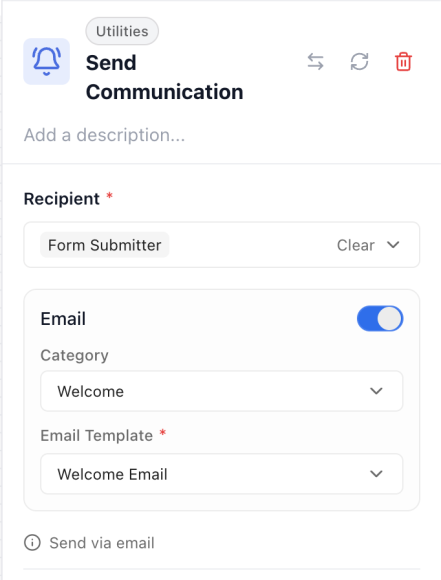
The Send Communication step sends an automated email using one of your configured email templates.
- Recipient (required) — who receives the email. Defaults to the Form Submitter (the lead), but you can instead select one or more members of your firm, or include both the lead and internal recipients.
- Category (optional) — filters the list of available email templates.
- Email Template — select the template to send from your Communications templates.
Conflict Check
Add a Conflict Check step to an intake workflow so a check runs automatically for each lead. It usually sits after the lead is qualified and before it is converted to a matter. The step's only setting is optional notifications. When turned on, the admin picks one or more active firm users, who receive an email when the check finishes. The email includes the lead's name and a link that opens the lead's Conflict Check tab directly. The email content is a standard template and can't be edited.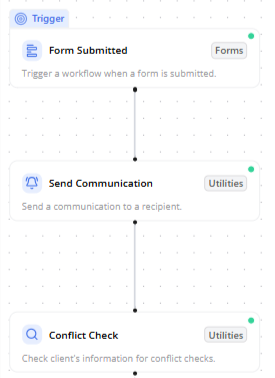
Send Documents
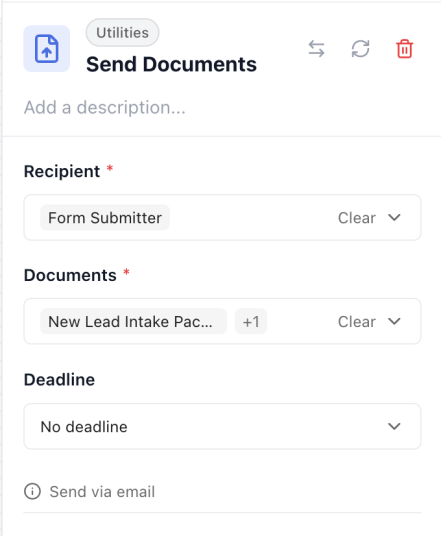
The Send Documents step emails recipients a secure link to download one or more document templates.
- Recipient (required) — who receives the document(s). Defaults to the Form Submitter (the lead), but you can instead select one or more members of your firm, or include both the lead and internal recipients.
- Documents (required) — select one or more documents from your templates to send. The combined size of all selected documents can't exceed 25 MB. If you haven't created any templates yet, you'll be prompted to go to Settings to add one.
- Deadline (optional) — choose how long the recipient has to download the documents: 7 days, 14 days, 30 days, or No deadline. When a deadline is set, the lead's access to the documents expires once that period ends. Firm users can continue accessing the documents at any time.
When this step runs, recipients automatically receive an email with a link to download the selected document(s).
Schedule Meeting
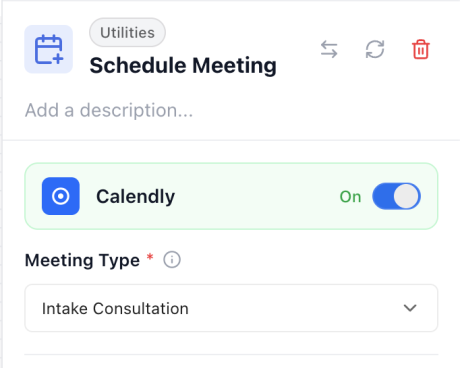
The Schedule Meeting step allows the lead to book a consultation through your connected Calendly account.
- Verify that the Calendly toggle appears as ON in the right-side panel.
- Select a Meeting Type (required). Available options are pulled directly from the event types configured in your connected Calendly account. Only event types that are active in Calendly appear here — event types that are turned off or deleted in Calendly, or that collect payment, aren't available, since the integration supports scheduling only.
Add Conditional Logic
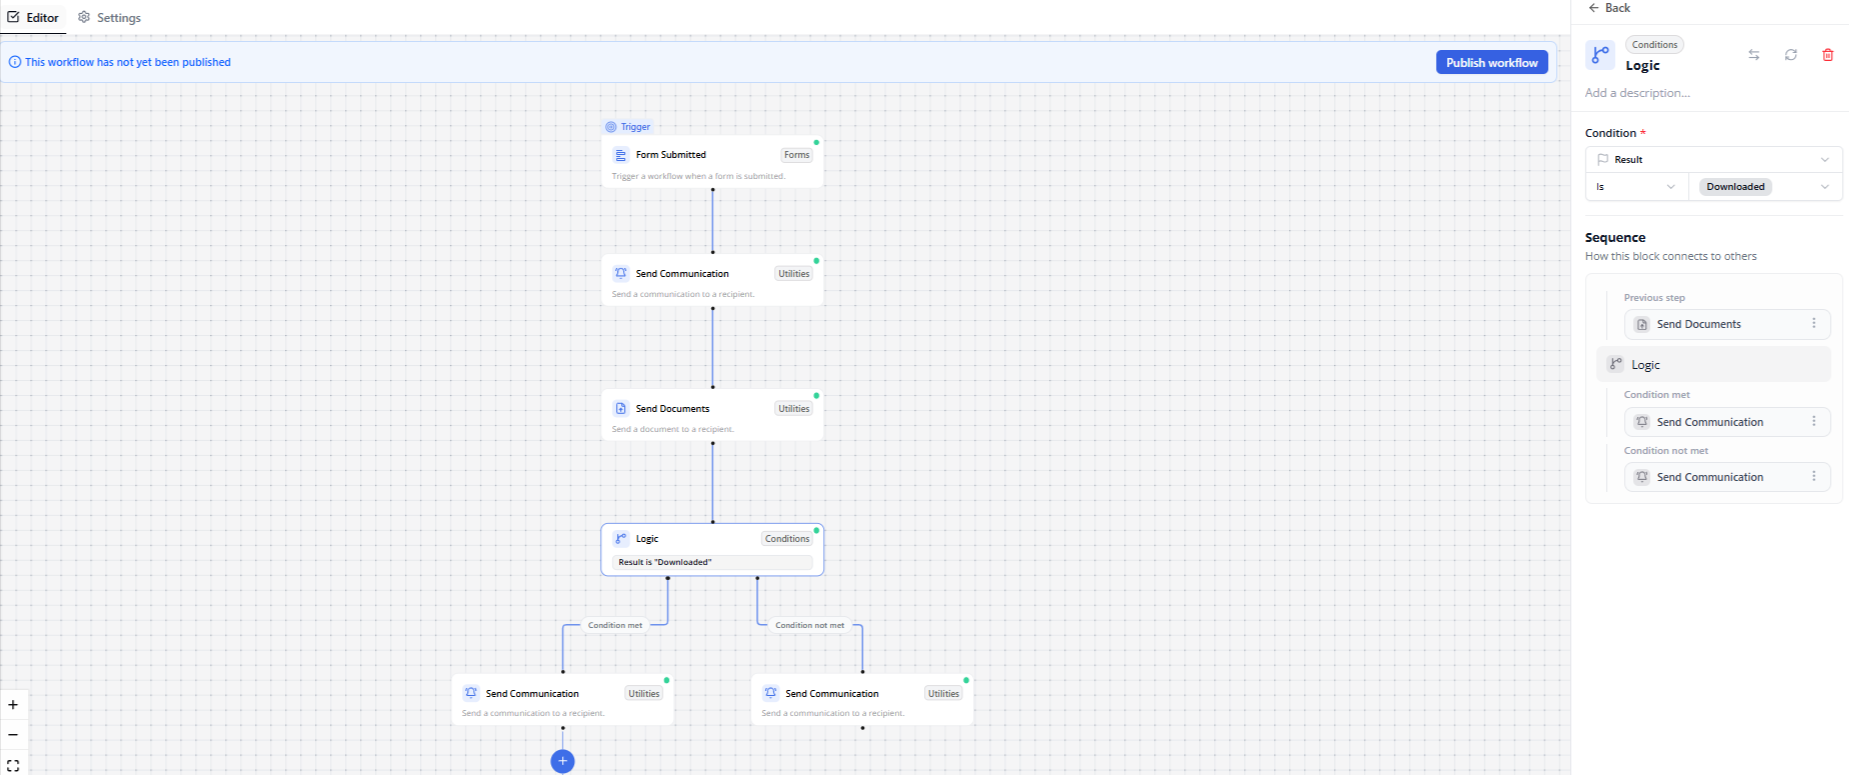
A Logic block must sit directly after one of two blocks:
-
Schedule Meeting
-
Send Documents
It can't follow any other block type, and it can't sit at the very start of a workflow. To add a logic block:
-
On the canvas, click the + after a Schedule Meeting or Send Documents block — or open that block's side panel and use its Next step section — then choose Logic from the block picker.
-
The block appears with two branch placeholders: Condition met and Condition not met.
-
Click the block to open its side panel and build the condition.
-
Assign a block to each branch — from the + on the branch placeholder directly on the canvas, or from the panel's Next step section, which shows two independent slots: Condition met and Condition not met.
Add Loop Block
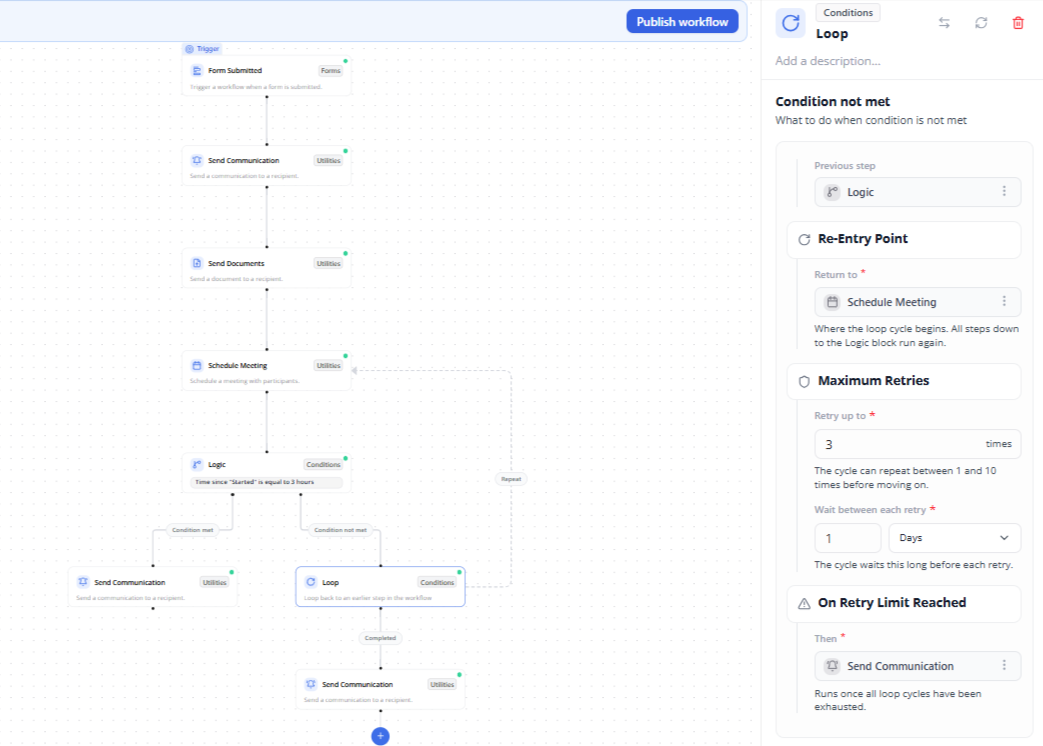
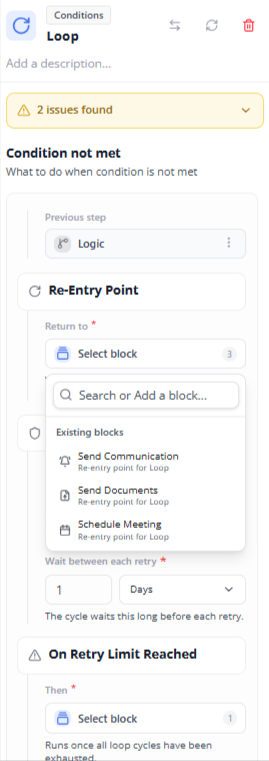
The Loop block follows the logic block and sends a loop back to an earlier point in the workflow based on the condition being met or not met. So a firm can retry something — like waiting for a document to be downloaded — a set number of times before giving up and moving on to the next step.
-
On the canvas, click the + after a Condition met and Condition not met block based on where you want to add the loop block.
-
On the block's side panel, use its Next step section — then choose Loop from the block picker.
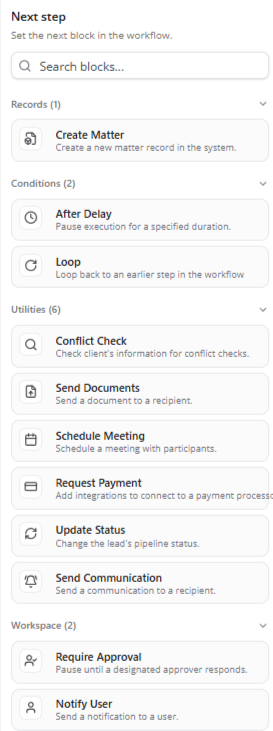
-
Select the re-entry point block from the blocks listed below. For example, your re-entry point could be schedule meeting if the user fails to send you documents.
-
Enter the number of days and times you wish to retry the loop step. After the specific number of tries, you can configure the next block. For example, if you user does not use your calendly link to schedule a meeting after the specified retries, you can configure the next step as send communication.
After Delay
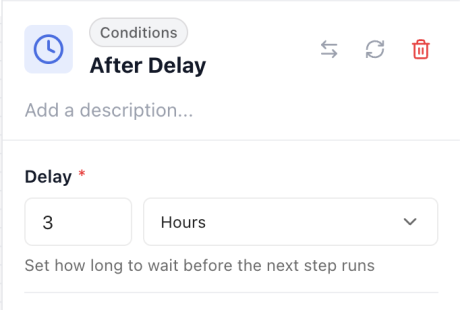
The After Delay step pauses the workflow for a set amount of time before the next step runs — useful for spacing out communications and other actions.
- Enter a number for the delay.
- Select a time unit: Minutes (up to 60), Hours (up to 24), or Days (up to 3).
- You can include multiple After Delay steps within the same workflow to create different waiting periods between actions.
Configure Failure Notifications
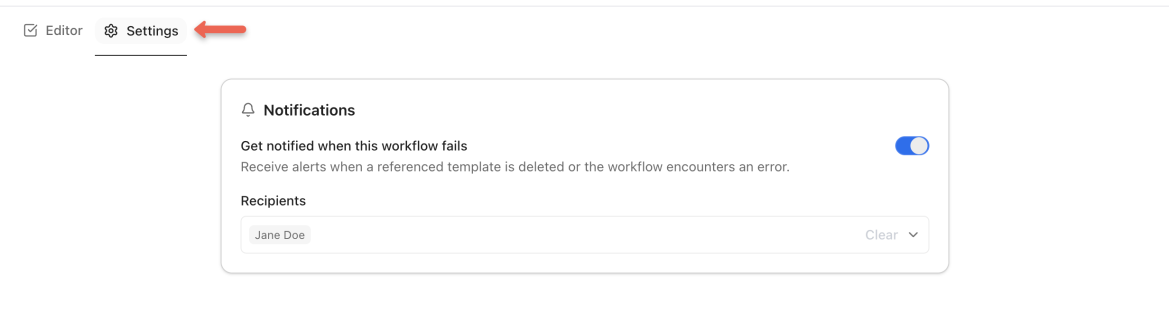
Select the Settings tab (gear icon) at the top of the Workflow Builder to configure Notifications, which determine who is alerted if the workflow encounters an issue that prevents it from running — for example, if a required template has been deleted, or the Calendly integration has been disconnected.
The notifications toggle is ON by default, and you (the workflow creator) are automatically included as a recipient. While notifications are enabled, your name can't be removed from the recipients list, though you can add other firm members. If the toggle is turned OFF, no one is notified when the workflow pauses due to a configuration issue.
Validate and Publish

As you build, the Workflow Builder continuously checks each step for anything that would prevent the workflow from being published. If a step has an unresolved issue, a yellow dot appears in the upper-right corner of its block, and a banner at the top of the builder shows the total number of issues found.
- Open the step marked with a yellow indicator.
- From the right-side panel, complete any missing or invalid required fields.
- Once resolved, the block's status indicator changes to green.
When every block is properly configured, click Publish workflow at the top of the builder to publish it and set its status to Live. The workflow then begins running automatically for new submissions of the associated intake form.
Manage Your Workflows
You can manage a workflow from the toolbar in the workflow canvas or from the All Workflows list.
From the toolbar in the upper-right corner of the canvas:
- Pause or Resume — click the toggle to pause a Live workflow or resume a Paused one. Pausing stops the workflow from processing new and in-progress leads; resuming starts it again. The toggle also appears on Draft workflows but is only enabled after publishing.
- Duplicate — click the duplicate button (double square icon) to create an independent copy of the workflow with the same steps and settings. Since a form can back only one workflow, you'll need to choose a form for the copy before publishing it.
- Version History — click the clock icon to see past versions and who edited them. Select a previous version and click Restore Version. Restoring a published workflow (Live or Paused) creates a new Draft copy from that version and leaves the original untouched; restoring a Draft replaces the current draft with the selected version.
Go to Intake > Workflows to open the All Workflows list, a grid of every workflow you've created. 
From here you can:
- Click the pencil icon on any row to open that workflow in the Workflow Builder.
- Click on the three dots and select Duplicate to duplicate the workflow.
- Click on the three dots and select the trash icon to delete a workflow.
To see what your leads experience as a workflow runs, see Using an Intake Workflow.