Conditional logic lets you build smarter intake forms that adapt to each client’s answers. Instead of creating a separate form for every practice area, you can show the questions that apply to a lead and hide the ones that don’t, make fields required only when they’re needed, and send leads directly to the sections that matter to them. You set all of this up with simple rules in the form builder.
How Conditional Logic Rules Work
Each rule has two parts — a condition and a result:
- If — the condition, made up of a source field, an operator, and a value. For example, Case type is Car accident.
- Then — what happens when the condition is met, made up of an action and one or more targets. For example, Show section Accident details.
After you save a rule, it appears as a card that reads “IF [condition] → THEN [action] [target]”. If the rule has more than one target, the card shows the first target followed by “+N more”.
Note: A rule’s source field must always come before its targets in the form. When you select a source field first, you can only choose targets that come after it. When you select a target first, you can only choose source fields that come before it.
Actions
You can choose from the following actions when you set up a rule:
- Show field or Hide field — shows or hides one or more fields. Select This whole section to choose every field currently in a section. Fields you add to that section later aren’t included.
- Show section or Hide section — shows or hides one or more sections, including their titles, descriptions, and fields.
- Make required — makes one or more fields mandatory when the condition is met. When the condition isn’t met, the field keeps the setting you gave it in the form builder.
- Go to another section — sends the lead directly to one section of your choice, skipping the sections in between.
The targets you select appear as chips on the rule. If you select more than three, the rule shows the first few chips and a “+n” badge for the rest.
Show Versus Hide
The action you choose also decides how a field or section first appears when a lead opens the form. A target with a Show rule starts out hidden and appears when the condition is met. A target with a Hide rule starts out visible and disappears when the condition is met. If you delete the last rule on a target, the target goes back to being visible.
Note: A field or section can have Show rules or Hide rules, but not both. Once a target has a Show rule, the Hide actions are no longer available for it, and the reverse.
Operators by Field Type
The operators available for a rule depend on the type of field you select as the source:
- Radio, dropdown, and toggle — is, is not, is empty, is not empty.
- Checkbox — is, is not, contains, doesn’t contain, is empty, is not empty.
- Text, text area, email, phone, full name, and address — is, is not, contains, doesn’t contain, is empty, is not empty.
- Number, currency, and rating — is, is not, is greater than, is at least, is less than, is at most, is empty, is not empty.
- Date and time — is, is not, is after, is on or after, is before, is on or before, is empty, is not empty.
- File upload and signature — is empty, is not empty.
Add Conditional Logic to a Form
To add conditional logic rules to a form:
- From the left navigation panel, go to Intake > Forms.
- From the forms in the grid, select the form you wish to add conditions to, or create an intake form.
- In the form that you have created you can open the conditional logic panel from three points:

- Add Rule in the toolbar opens the panel with all rules. It is not available while fields are selected in bulk.
- Conditional Logic icon on a field, to the left of the copy icon.
The panel scrolls to the rules where that field appears and highlights them. If the field has no rules, the panel opens at the top of the list. - Conditional Logic icon on a section, shown on hover next to the edit icon. The panel opens with all rules.
- Click + Add Rule in the panel header. The New Rule panel opens with an empty rule card.
Create a Rule
To create a rule: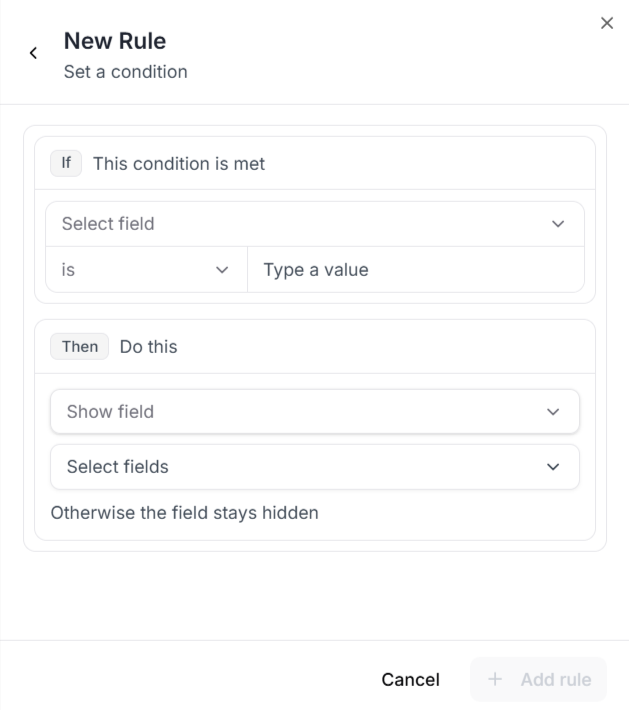
- From the Select field dropdown under If, choose the source field. Layout fields such as headings, info blocks, sections, and buttons aren’t listed because they don’t collect answers from your clients.
- From the operator drop-down, select an operator.
- From the value field, enter or select the value. Choice fields list their own options, text fields accept free text, number, currency, and rating fields accept a number, and date and time fields use a picker. The is empty and is not empty operators don’t need a value.
- From the action dropdown under Then, select an action. Show field is selected by default.
- From the Select field or section dropdown, choose one or more targets. The list is grouped by section and includes its own search.
- From the New Rule panel, click Add rule.
The new rule appears in the list, ordered by the position of its source field in the form, and the rule count updates. The Add rule button stays disabled until you’ve set the source field, operator, value (when needed), action, and at least one target.
Tip: To leave without saving, click Cancel, and then click Discard changes in the Discard this rule? dialog.
Rules That Can’t Be Saved
To keep your form working the way you expect, CosmoLex won’t save a rule that conflicts with your existing logic. Keep the following in mind:
- Duplicate rules — if a rule matches an existing rule exactly, an error appears and you can’t save it until you change at least one value.
- Required and hidden fields — you can’t make a field required under the same condition that another rule uses to hide it. If the Hide rule uses a different condition, both rules save, and the field is never required while it’s hidden.
- Routing to a hidden section — you can’t route leads to a section that’s hidden under the same condition. If the section is hidden under a different condition, the rule saves with the warning “[Section name] may be hidden — check its visibility rules”.
Route Leads to Different Sections
Routing makes longer forms faster to complete, because each lead moves only through the sections that apply to them. Add a question near the start of your form, such as Case type, and then create a Go to another section rule on it for each path.
Here’s how routing works as a lead moves through the form:
- When the lead clicks Next and the condition is met, the form goes straight to the destination section.
- When no routing condition is met, the form moves to the next section in order.
- When more than one routing rule on a section is met, the first rule in the list applies.
- When the destination section is hidden at that moment, the form moves to the next section in order.
- When the lead clicks Back, they return to the section they came from, not the previous section in the form.
Test Your Form in Preview
Preview applies your rules exactly the way the published form does, so you can check each path before your leads see it.
To test your form:
- From the Content tab, click Preview.
- From the preview, answer the source fields the way a lead would. Fields and sections appear and disappear, required indicators switch on, and Next follows your routing rules.
- Repeat for each path your form supports.
Note: You can’t submit the form from Preview.
What Your Leads See
Conditional logic works in the background, so your leads only see the questions that apply to them. Keep the following in mind:
- Hidden fields and sections don’t appear on the form at all. They aren’t grayed out or locked.
- A field or section appears as soon as its condition is met, without reloading the page.
- If a lead changes an answer and a field or section disappears, anything they entered there is cleared and isn’t submitted. If the field appears again, it starts from its default value, or empty if it doesn’t have one.
- Hidden fields aren’t validated or submitted. Fields inside a hidden section are treated as hidden.
- When a Make required condition is met, the field shows the required indicator and the lead can’t submit the form without completing it. If the lead changes their answer, the requirement is removed and anything they already entered stays.
- A hidden field is never required.
- The progress indicator counts only the sections on the lead’s own path and updates each time they click Next.
Review and Find Rules
Rules in the Conditional Logic panel appear as collapsed cards, ordered by the position of their source field in the form. Click a card to expand it and see its full details, including every target. You can’t make changes from the expanded card. To open or close every card at once, click Expand all or Collapse all from the panel toolbar.
As your form grows, you can use search and filters to quickly find the rule you need. From the panel, type a term or condition in Search to see only the rules whose source field or target matches.
To filter the list of rules:
- From the Conditional Logic panel, click the filter icon to the left of the search box.
- From the filter menu, choose a filter type: Section, Field type, Target type, Action type, Rule status, or Has issues.
- From the list that opens, select the options you want. Click All to select every option.
- Close the filter menu.
Your filters stay applied, and the filter icon shows how many filter types are active. Search and filters work together, so you can combine them to narrow the list further. To remove all filters, click Clear all at the bottom of the filter menu. This doesn’t clear your search.
Note: While search or filters are active, the issue banner counts only the issues on the rules you can see.
Edit a Rule
To edit a rule:
- From the rule card, click the three-dot menu and select Edit Rule. If the card is expanded, click the pencil icon instead.
- From the Edit Rule panel, make your changes. If the rule has any issues, they’re listed in a yellow banner at the top of the panel.
- From the Edit Rule panel, click Save Changes.
The card updates with your changes, and your form is checked for issues again. To leave without saving, click Cancel, and then click Discard in the Discard changes? dialog.
Activate or Deactivate a Rule
When you need to pause a rule temporarily, you can deactivate it instead of deleting it. Its settings are kept, so you can turn it back on at any time. To activate or deactivate a rule, from the rule card, toggle the button on/off. Your change saves immediately.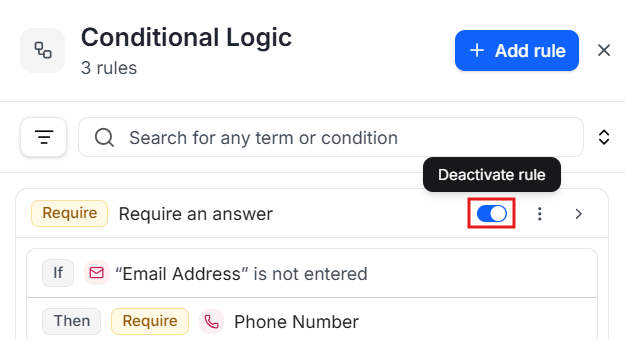
New rules are active by default. When a rule is inactive:
- It appears dimmed in the panel and as Inactive in the List view.
- It has no effect on your form.
- It doesn’t raise issues or stop you from publishing.
If you deactivate the only Show rule on a field, the field becomes visible. If you deactivate the only routing rule on a section, leads move through the sections in order. When you activate the rule again, its effect and any issues return.
Note: You can’t activate a rule if an identical rule is already active.
Delete a Rule
To delete a rule:
- From the rule card, click the three-dot menu and select Delete Rule.
- From the Delete this rule? dialog, click Delete.
The rule is removed from the list, and the fields and sections it affected no longer respond to its condition.
Review Rules in the List View
The List view shows all your rules in a table, so you can review, sort, and export your form’s logic in one place.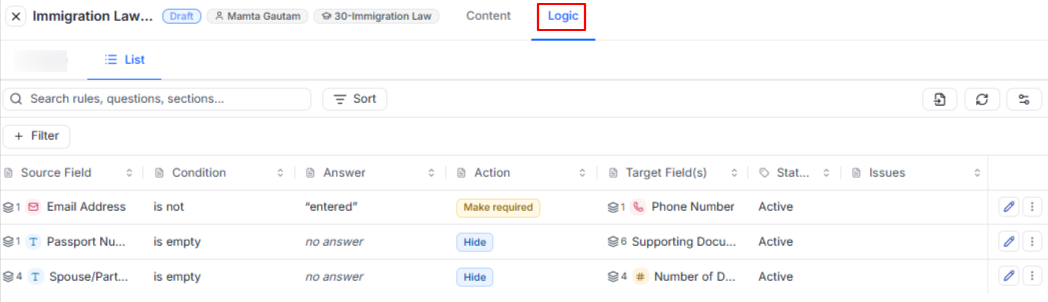
To review rules in the List view:
- From the top of the form builder, click the Logic tab.
- From the table, review your rules. Each row is one rule, listed in the same order as the Conditional Logic panel.
- From a row, click the edit icon to open the Edit Rule panel, or click the three-dot menu to activate, deactivate, or delete the rule.
The table includes the following columns:
- Source Field — the section number, type icon, and name of the source field.
- Condition — the operator, such as “is” or “is greater than”.
- Answer — the value in the condition.
- Action — what the rule does, such as show, hide, or make required.
- Target Field(s) — every target, with its section number, type icon, and name.
- Status — whether the rule is Active or Inactive.
- Issues — an icon that appears when the rule has an issue. Hover over the icon to see the details.
You can also search, filter, and sort the table, pin and reorder columns, and export your rules to CSV. If a rule’s source field or target has been deleted, it appears as Deleted source or Deleted target.
Resolve Logic Issues Before Publishing
When you update a form by deleting a field, reordering sections, or removing an option, some of your rules may no longer work as intended. CosmoLex checks your rules after every change and flags any problems, so you can fix them before your leads see the form.
There are two types of issues:
- Errors — prevent you from publishing a Draft form.
- Warnings — let you know about a possible problem but don’t prevent you from publishing.
Common Logic Errors
You’ll see an error when:
- A rule is missing a source field, operator, value, or target.
- Two rules give opposite instructions to the same target under the same condition.
- A rule’s source field now comes after its target, such as after you reorder sections. On a published form, this is a warning.
- A field is required but hidden with no way to show it, or sits inside a hidden section.
- A section is hidden under the same condition that makes a field inside it required.
- A rule’s source field or target was deleted.
- A rule uses an option that no longer exists on its source field.
- A rule’s operator no longer works with its source field’s type.
- A section can’t be reached by any path through the form.
- A rule routes leads to a section that’s hidden under the same condition.
Note: Rules with different source fields that affect the same target aren’t flagged as issues. Inactive rules never raise issues.
Find and Fix Issues
To find and fix issues in your form:
- From the top of the Content tab, click the yellow banner that reads “[x] logic issues found”. The Conditional Logic panel opens and highlights the first rule with an issue.
- From the rule card, hover over the issue icon to see what’s wrong.
- From the rule card, edit or delete the rule, or update the field or section causing the problem.
- From the panel banner, click the > arrow to move to the next issue, or the < arrow to go back.
Resolved issues clear automatically after each save, with no need to refresh the page. Some issues, such as a required field that’s hidden, belong to a field rather than a rule. These are counted in the banner but don’t flag a rule card.
Note: Clicking X on the banner hides it until you open the form again, but doesn’t resolve the issues.
When you delete a field or section that a rule uses, here’s what happens to the rule:
- Source field deleted — the rule stays and is flagged. Edit the rule to choose a new source field, or delete it.
- Target deleted — the rule stays and is flagged as incomplete. Delete the rule.
- Source field and target deleted — the rule is removed automatically.
- Source field or section of a routing rule deleted — the rule is removed automatically.
Publish a Form With Conditional Logic
You can save your form at any time, even when it has issues. However, a Draft form can’t be published until all errors are resolved.
To publish a Draft form:
- From the form builder, click Publish. If your form has any errors, the Cannot publish with issues dialog opens and shows how many issues need to be resolved.
- From the dialog, click Review issues to return to the form builder.
- Fix all errors, and then from the form builder, click Publish again.
If you edit a form that’s already published, any new issues appear in the banner, but the form stays Published and your changes continue to save. When you close the form builder with issues remaining, the Form has conditional logic issues dialog opens. From the dialog, click Review issues to stay and fix them, or click Cancel to close the form builder with your changes saved.